For many vapers, winding your own coils is much more than just a method, to save money – it’s a hobby, that allows maximum individualization. Whether you want to chase thick clouds or get the purest flavor from your e-liquid: The perfect winding is the key to success.
In this guide from Myvapesite Find out everything about the tools you need, different types of winding and how to safely build your first coil.

Wind coils yourself: The Ultimate Guide to RDA, RTA and RBA
Why build your own coils??
Self-winding evaporator (Rebuildable Atomizers) offer three decisive advantages:
- Cost efficiency: A piece of wire and some cotton only costs a fraction of a finished replacement coil.
- The taste: By choosing the material and diameter you can perfectly control the aroma.
- sustainability: They produce significantly less waste than with single-use systems.
Checklist: You need these accessories
To make a high quality winding, You should use special steamer tools. Many utensils can be found in the toolbox, but precision is crucial here.
- resistance wire: For beginners we recommend Kanthal A1, Ni80 or stainless steel (SS316L).
- Side cutters (Flush Cutter): For cutting the wire ends flush with the posts.
- Ceramic tweezers: Essential, around the coil while heating up (Annealing) to squeeze together, without causing a short circuit.
- Changing aid (Coil Jig) or precision mechanic screwdriver: To wind the wire evenly.
- Cotton wool: Untreated organic cotton for optimal capillary action.
- Ohm meter or regulated battery carrier: For precise measurement of resistance.
Micro-Coils vs. Macro-Coils
The inner diameter of your winding significantly influences the resistance and flow of the liquid.
| Typ | Inside diameter | Characteristics |
| Micro-Coil | 1,0 mm – 2,0 mm | Fast heating, ideal for small decks (MTL). |
| Macro-Coil | 2,5 mm and larger | More surface area, lots of steam, needs more power (DL). |
Important rule of thumb: The more turns and the larger the diameter, the higher the electrical resistance (Ohm). We recommend beginners 6 bis 8 Turns with 26GA Kanthal wire on one 2,5 mm diameter.
Step-by-step instructions: Here's how to wind your coil
- Prepare wire: Cut approx. 10–15 cm of wire.
- Wrap: Place the wire around the changing aid. Keep it under tension and wind the desired number of turns tightly together.
- Installation: Insert the wire ends (Legs) into the posts of your evaporator deck (RDA/RTA). Tighten the screws securely.
- Align: Center the coil. It must not touch the deck, the evaporator chamber or the top cap (Danger of short circuit!).
- Annealing (Dry Burn): Fire the coil briefly at low wattage. It should glow evenly from the inside out. Remove “Hotspots” by gently stroking with ceramic tweezers.
- Moisten: Pull a suitable strip of cotton through the cooled coil. The cotton should fit tightly, but can still be moved.
- Liquidate: Soak the cotton generously with e-liquid, before assembling the tank.
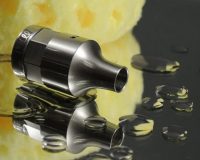
Special features of RDA, RTA and RBA
- RDA (Dribbler): Usually offers the most space. Pay attention to the positioning of the coil in relation to the airflow.
- RTA (Tank evaporator): The padding is crucial here. Too much cotton leads to backflow problems (burnt taste), too little cotton to leak.
- RBA (Rebuildable Base): These are self-winding units for traditional prefabricated coil tanks. Space is often very limited here, why micro coils are the best choice.

Safety information (Important!)
Working with electricity requires caution. Take advantage of that Ohm-Meter, to ensure, that your resistance is in the safe range for your battery. At Dual-Coil-Setups the total resistance is halved (z.B. two 0,6 Ohm coils make up together 0,3 Ohm). Find out about Ohm's Law, before using mechanical battery mods.